Roll Forward

Roll Forward Types
There are three roll forward options to choose from:
- Roll Forward the Tax Data: Carries forward all narrative information from the previous tax return.
- Retain Previous Year Amounts: Carries forward monetary values entered in the previous year.
- Retain Notes: Carries forward all notes associated with the selected tax return.
Note: you can only Roll Forward the data for clients that have a previous tax return.
Batch Roll Forward
You can roll forward the tax return data for several clients using Batch year creation and roll forward.
Simple Batch Roll Forward
-
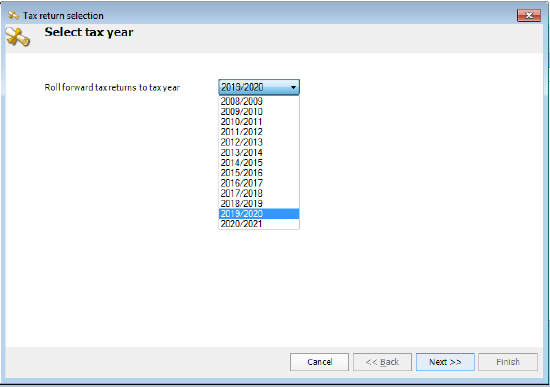
Select File > Tools > Batch year creation and roll forward year creation and roll forward. The Tax return selection wizard appears with the Select tax year step.
-
Select the tax return year from the Roll forward tax returns to tax year drop-down.
-
Click Next. The Filtering Clients step is displayed.
You can filter clients by:
- Company
- Department
- Office
- Partner responsible
- Assignment Manager
- Assignment Partner
- Manager
- Personal Tax Manager
- Personal Tax Partner
- Personal Tax Team Member
- Team Member
- Click Next. The Client Selection step is displayed.
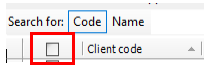
Do one of the following to select clients:
-
Click the check box next to Client Code to select all clients.
-
Click the check box next to individual clients.
Note: You can only Roll Forward the data for clients that have a previous tax return.
-
Click Next. The Tax return roll forward options appear.
-
Select the roll forward options that apply:
- Roll Forward the Tax Data
- Retain Previous Year Amounts?
- Retain Notes?
- Create Statement of Account?
-
If needed, add Workflow Defaults details. Choose a workflow template from the Select a workflow template to attach to the new tax returns drop down list.
-
Click Next. The Creating tax returns step is displayed showing a list of the selected tax returns including the Client Code, Name, Type, Status and Message details.
-
Click Finish. The Status changes as the tax returns are In Progress, Rolled forward, and then Completed. After the step completes, the Roll forward results list opens in a new tab. You can Print the list, Export it to PDF or Close the tab.
Batch Roll Forward using a Report
The Batch Tax Return Selection and roll forward wizard can also be run from Central’s Find Clients screen allowing improved filtering options.
To run the batch roll forward wizard via Central's Find Client screen:
- Use a relevant report or search criteria to list available clients.
- Select the required clients, either all clients or a sub set.
- In the Tasks Bar select the
 button to run the wizard.
Note:
The Filtering clients step is not used when running the wizard from Central's Find Clients screen. When filtering is required this must be applied in the Central report.
Not all clients selected in the Find Clients screen may appear in the wizard's Client selection step. Only clients with no tax return for the selected tax year appear in this step.