Financial Statements

Financial Statements Main View
Select Financial Statements from the Financial Reporting folder in the Task Bar list.
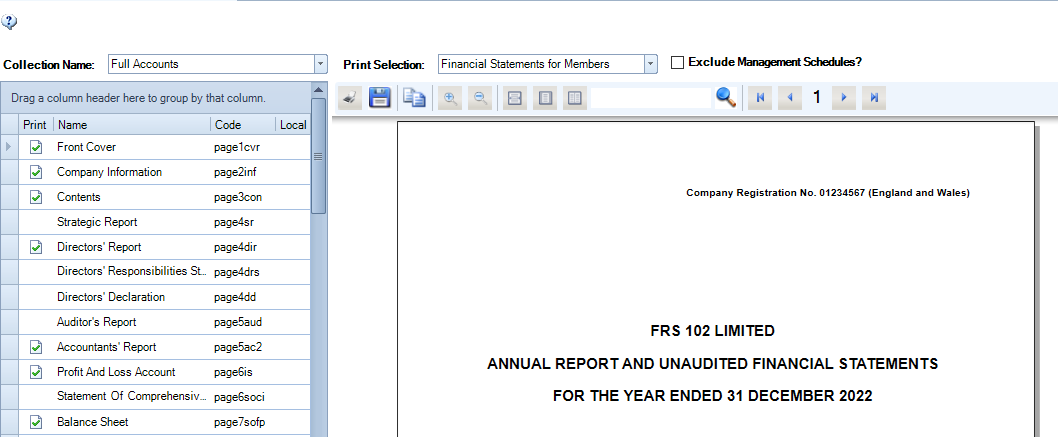
The financial statements page is split between a collection grid containing a list of formats e.g. Full Accounts, and a preview pane.
Collections
A collection is a group of formats that together make up the financial report to be produced.
Collection Name. The collections available differ according to the type of entity you are in. The collection extract shown above is for a Limited (FRS102) entity, other collections within this entity are "Management" and "Lead Schedules".
The Collection grid contains the list of formats (pages and notes) available within the selected Collection. Formats have conditions, which will automate their inclusion in a financial report. Those to be included are marked with a tick in the Print column.
- To display the list of the formats in a collection, select the Collection Name from the drop-down list.
- The default Collection is Full Accounts.
Managing or creating a Collection
In addition to the standard collections, bespoke collections may be added at a client level (permission dependent).
- To add a collection, select Add Collection from the ribbon. Enter a name for the collection and it will be added to the list. Initially, the collection will be empty, pages may be added using Add Format or Copy Format, see below.
-
In order to change the order of pages / notes within a collection Change Sequence must first be activated. Once clicked, pages can be dragged to the required position. This system is in place to avoid accidentally changing the order of the pages.
- Reset Collection adds back any accounts pages that have been removed from the Collection in line with the master collection but keeps any local pages.
- Revert to Default returns the collection to its master state, removing local pages, resetting the Print column of any pages that have been included or excluded, and adding back any pages that have been removed. Obviously this is more drastic than Reset Collection.
- Refresh reevaluates which pages need to be printed.
Collection grid (contents)
Within the collection grid you will usually see 3 or 4 columns depending on whether the Code column has been included, being Print, Name, Code, Local.
- The Print column indicates whether the page will print, this depends on the page's Print Condition. A page can be forced to be included or excluded using the options on the context (right-click) menu shown below. If forced to be included/excluded print a blue tick or cross will be shown in the print column. View Active Formats filters those with ticks and only displays the list of formats to be printed.
Note: it is unusual for a page or note to be forced to be included or excluded as they work on conditions. A trigger or paragraph will have been activated in the statutory database or a certain nominal code will have been posted to. Certain pages will always print e.g. the balance sheet. - The Name column displays the name of the format within the grid not the name on the page e.g. Profit and Loss Account may be Income Statement on the actual page.
- The Code column shows each page's code. These may be used in formulae for the page reference of other pages.
- The Local column indicates that the page has been made local.
Further columns may be selected from Show Field Chooser (right click to access) for example the Condition column displays page's Print Condition. f1 means the number 1. So f1=f1 above is the syntax used to mean the page will always print, because 1 always equals 1.
Searching within a Collection
To search for a format within a Collection, under Name is a search box on the ribbon that provides a quick way of searching for the name of a page or note, e.g. enter "tax" to find any notes with the word tax in the name.
The context menu
(right click within the collection grid)
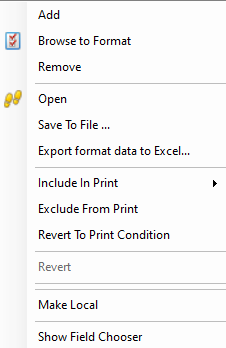
- Add allows an accounts page to be copied from a different collection for the current client. The page is linked into the destination collection and the page always displays the same results in either collection.
- Browse to Format allows an existing accounts page to be loaded from disk. It can be used with Save To File to copy an accounts page from one client to another.
- Remove removes the page from the list of accounts pages for this client.
- Open opens the accounts page for editing, but it is more common to double-click it. Once open, select the tab if more than one, click Draft on the ribbon to view the full format.
- Save To File saves the selected accounts page to disk. Once an accounts page has been saved, it can be loaded into a different client or to the master level using Browse to Format.
- Export format data to Excel exports an accounts page to Excel. It has a limitation that it does not show the page headers in the correct font.
- Include in Print, Exclude from Print and Revert to Print Condition are related. Include in Print forces a page to print even if its print condition is not satisfied. Exclude from Print prevents a page from printing. Revert to Print Condition returns the page to being printed if the print condition is satisfied.
- Revert and Make Local are related. Make Local makes a page local, i.e. the page is copied to the current client where it can be edited. Revert replaces the local page with the master copy. The local page is not actually deleted and the user is given the option to reuse it if Make Local is selected again.
- Show Field Chooser allows the user to select which columns are displayed.
Resetting/Reverting collections
If you have changed a collection by adding and removing formats, you may wish to return the collection back to its original state containing the list of default formats. There are two ways to do this Reset Collection or Revert to Default. The different behaviour is explained below:
Reset Collection (soft):
- Local formats - will remain in the collection
- Force include/exclude (print condition has been overridden) - no change to the overridden print condition
- Removed format from FS collection - removed formats will come back into the collection
- New format (added into Format Designer collection) - new formats will appear in the collection
Revert to default (hard):
- Local formats - will be removed from the collection
- Force include/exclude - all print conditions will be reverted to master
- Removed format from FS collection - removed formats will come back into the collection
- New format (added into Format Designer collection) - new formats will appear in the collection
Revert to default is only accessible for users with access to the Task Permission #Financial Statements #Revert Collection and a warning message will be displayed.
Print, Preview and Publish options
Print Selection
The Print Selection, to the right of the Collection Name, is activated for small companies with a drop down to be able to select Small Company Reduced Filing. Medium/ large companies not filing the Detailed Profit and Loss account will click on the box beside Exclude Management Schedules?
Preview Panel
The panel to the right of the grid shows a preview of the selected format. As only one format is being previewed in this panel, page and note numbers will only relate to the single format and cross references to other notes will not be shown. These will be correctly determined when a preview of the full report is run. Show/hide preview on the ribbon removes the accounts preview panel from the right of the screen.
To preview and/or print the full report
Select the Collection Name, using the drop-down list, and click Preview on the ribbon. The full report (pages and notes activated with a tick) will be spooled and can be printed from the full preview screen by clicking on the printer icon on the Print preview toolbar.
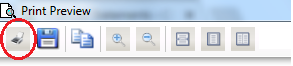
Other options on the print preview toolbar allow the report to be saved as PDF or Docx; to zoom in and out and to show the report in various pre-set modes.
To preview or print a single format
Single click on the name in the grid and, the format will be displayed in the preview pane, to the right of the screen, to print click on the printer icon.
To drill down from a previewed set of accounts
The software will allow drill down to the source of certain elements of a report.
- In the statutory accounts and notes, clicking on figures will drill down to a dialog listing the nominal accounts that make up the figure. You cannot edit the figures from this drill down but can see where the nominal account they have been posted to.
- Click on text that has been drawn from a cell in a format, a pop-up will be displayed and allow editing for paragraphs drawn from the statutory database e.g. amongst others the registered number on the information page, and principal activities text.
To print to Pdf/Docx
- Choosing the option Print to Pdf/Docx on the ribbon allows the Financial Statements to be saved as a PDF or MS Word file. Once the accounts have spooled the Save As dialog will appear, choose the type to generate from the *Save as type drop-down, specify the file name, and click Save.
- To apply encryption to the PDF, choose the Pdf Document [Encrypted](*pdf) option, you will be prompted to enter and confirm a password.
To publish to CCH OneClick and or CCH Document Management
- If you have purchased CCH OneClick, you can publish the accounts to CCH OneClick by selecting the Publish to OneClick on the ribbon. You can also set if the accounts require approval from the recipient. Any subsequent approval action can act as a trigger within CCH workflow to advance to the next step in a process.
- If you have purchased CCH Document Management, you will be prompted at this point to upload the PDF or Docx file to the Document Centre. Alternatively, you may directly upload the set of accounts to the Document Centre by clicking the action “Publish to DM” from the Ribbon.
Adding, Copying and Removing Formats
Add Format
- To add a format to a collection from another collection, select the row in the collection grid where the format is to appear
- Select Add Format from the ribbon, or the Add option from the right click context menu.
- From the Select a format to add pop-up, choose the Collection e.g. Management and ensure the Company Size is set to: Default.
- Click OK to complete.

Copy Format
Duplicates a page in the current collection and makes the copy local.
- Select the row in the collection grid where the format is to appear, select Copy Format from the ribbon.
- From the Copy format box, enter the name of the format, the size will be Default.
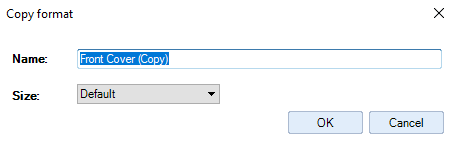
Note: The code of the format will be the same as the one it has been copied from, change the Format Code in the Page Set up so that it is unique. To access page set up double click on the format name in the grid, the page set up is on the ribbon.
Browse to Format
To bring in a format which has been saved externally, using the Save to File option from the right click context menu.
Select Browse to Format on the ribbon (or right click context menu).
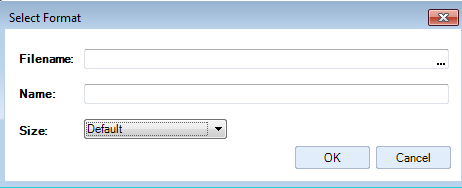
- A pop-up box will appear, search for the Filename by clicking on the ellipsis button, change the Name of the file if required, the Size should be Default.
- Click OK to complete.
If the Format Code is the same as another in the Collection change it in page set-up as described above.
Remove a Format
To remove a format from a collection, right click within the collection grid to show the context menu and select Remove. The format will sit behind the Collection and may be brought back in by selecting Add Format.
Launching CCH iXBRL Review and Tag
- Click on Review iXBRL on the ribbon to launch CCH iXBRL Review and Tag, this generates the accounts and opens CCH iXBRL Review and Tag for the client.
- The accounts are saved in xml format before CCH iXBRL Review and Tag opens to be able to review, tag, send a test submission to HMRC or to file with Companies House.