CCH Accounts Production Screens

Home Screen
The CCH Accounts Production Home screen appears as follows.
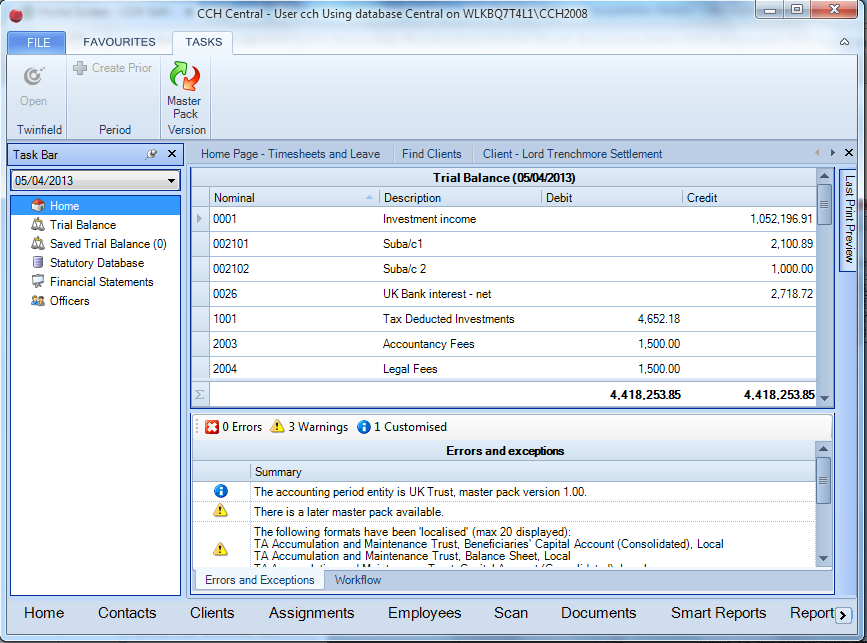
This is the Home screen. It has a Ribbon and 4 panels:
Ribbon
Only 1 button is enabled:
- Master Pack Version. This can be used to change the version of the Master Pack in use on this client if Practice Masters are being created.
Last Print Preview Panel
This is a preview of the last set of accounts produced. This is not visible above as we have pinned it to hide it. The only sign of it is the words “Last Print Preview” running down the right side of the screen.
Task Bar Panel
This is shown on the left. It contains 3 sections:
- The year at the top. This can be changed to see the last year’s trial balance. Note that currently Accounts Production only holds Statutory Database information for Trust Accounts for the current year. So prior year accounts cannot be regenerated.
- The menu at the bottom. Most menu options are greyed out for Trust Accounts users. Selecting the Home option displays the screen shown above.
- The Actions section in the middle. This shows the Actions applicable to the currently selected menu option.
Trial Balance Panel
This is the trial balance passed from Trust Accounts to AP. If rounding was specified in Trust Accounts, the trial balance will be rounded. The trial balance is updated automatically from Trust Accounts at the point when it is displayed. If an entry is made in Trust Accounts while the trial balance is open, the new values will not appear until the trial balance comes to be redrawn, e.g. after moving to another menu option and back again.
Errors and Exceptions Panel
For trust cases, this panel contains no useful information.
Trial Balance Screen
Selecting Trial Balance on the menu, shows the trial balance occupying most of the screen. In this version, comparative balances are shown.
Saved Trial Balances Screen
This screen is automatically populated with any saved trial balances requested in Trust Accounts using the Autoload. These are useful for periodic trial balances, trial balances for a specific beneficiary or even trial balances from other clients. There are more details about the Autoload later in these Release Notes. However few sets of trust accounts need to use Saved Trial Balances.
Statutory Database Screen
This screen appears as follows:
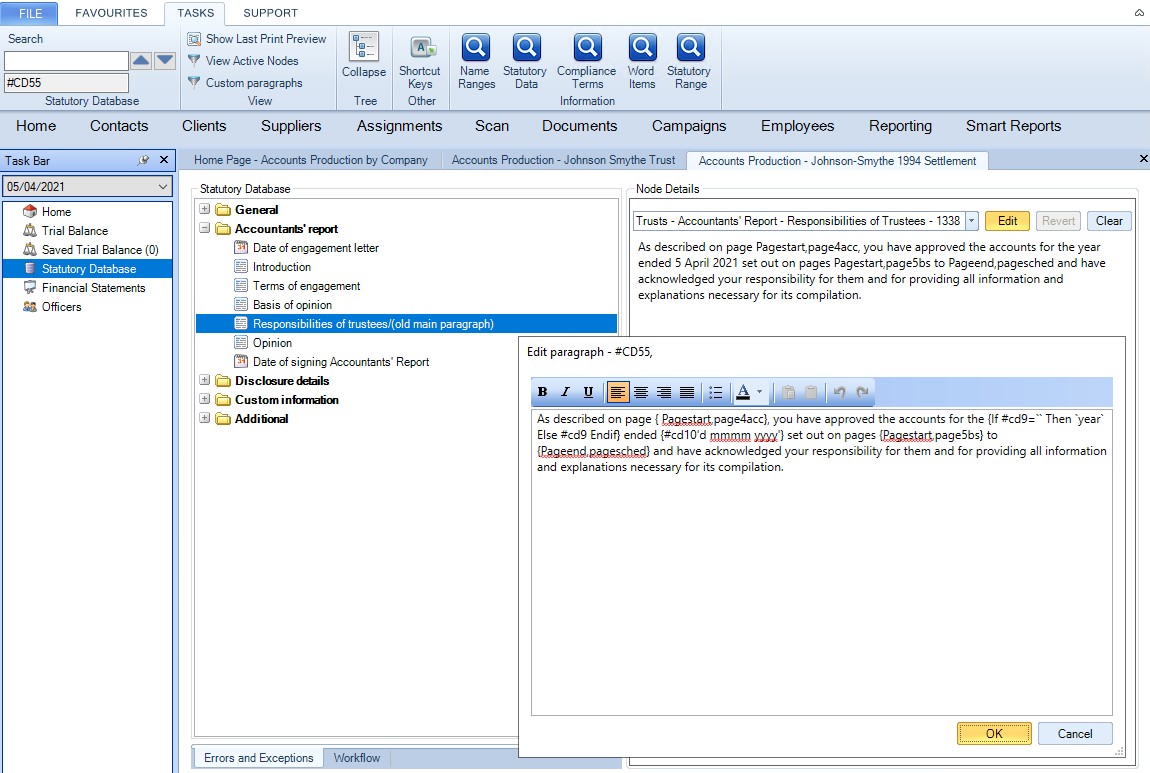
The Statutory Database holds items of data that are used in the accounts apart from the trial balance and the contact names of officers. Each item is identified by a code. In an accounts page, the text of this paragraph would be included by entering the formula =AP(“#cd55”).
- Search: The Search control is used to find a paragraph from its code.
- Code :The code for the selected paragraph, “#cd55”, is shown in the Code control.
- Statutory Database: folders. All the available Statutory Database nodes can be seen in a folder structure. Instead of using the Search control the user can select a node by browsing the folders. The selected item above is Responsibilities of trustees (old main paragraph).
- Node Details: The data relating to the selected node is shown on the right.
- Node Details: dropdown. CCH provide master paragraphs and these can be selected by using the dropdown list. If the user has written their own paragraph the dropdown says '[custom]'.
- Edit: Click the Edit button to edit the text.
- Revert: If the node displays a master paragraph and this paragraph is edited, then click Revert to revert to the CCH version.
Financial Statements Screen
The Financial Statements screen appears as follows:
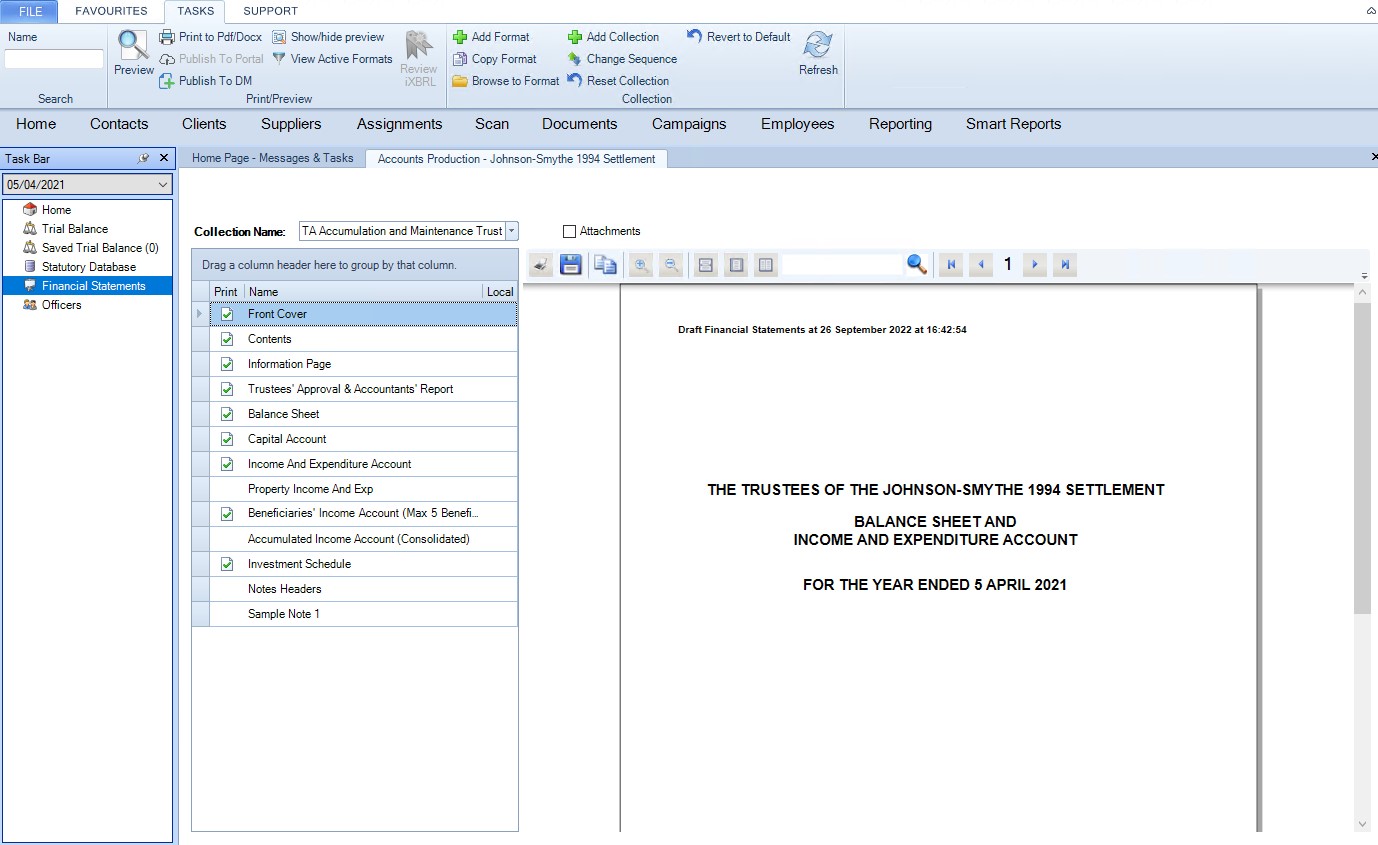
The accounts pages are listed in the centre of the screen.
- The Print column indicates whether the page will print, which depends on the Print Condition. In addition a page can be forced to be included or excluded using the options on the context (right-click) menu shown above. This is also indicated in the Print column with a blue tick or cross, respectively.
- The Local column indicates that the page has been made local. In the above screenshot, none of the pages have been localised.
The options on the Ribbonbar are as follows:
- Preview/Print displays the accounts.

- Print to Pdf/Docx allows the user to save the accounts in Adobe PDF or Word format. Saving to Word works much better than in VAP.
- Show/hide preview removes the accounts preview panel from the right of the screen.
- Add Collection is used to create a new collection. The Collection is only available for the selected client.
- Add Format allows an accounts page to be copied from a different collection for the current client, or from another client. If the page is added from another client, then it is duplicated so that a change in the source client does not affect the destination client. If the page is added from another collection of the same client, then it is just linked into the destination collection and the page always displays the same results in either collection.
- Browse to Format allows an existing accounts page to be loaded from disk. This can also be used to convert an individual VAP accounts page.
- Click Browse to Format
- Click … next to Filename to browse.
- Change the file type from “Format files (*.cchx)” to “All files (*.*)”
- Select the VAP accounts page.
- The accounts page is converted and loaded into CCH Accounts Production.
This method works well but cannot convert page references from numeric form, e.g. =AP(“PageRange,4,0”) to named form, e.g. =AP(“PageRange,page4acc,0”). So this change needs to be performed manually after converting the page.
- Copy Format duplicates a page in the current collection and makes the copy local.
- Reset Collection adds back any accounts pages that have been removed from the Collection.
- Revert to Default returns the collection to its master state, removing local pages, resetting the Print column of any pages that have been included or excluded, and adding back any pages that have been removed. Obviously this is more drastic than Reset Collection.
Right-clicking an accounts page displays the context menu.
- Add means Add Format and is the same option as on the Actions menu.
- Browse to Format is also the same as the option on the Actions menu.
- Remove removes the page from the list of accounts pages for this client.
- Open opens the accounts page for editing, but it is more common to double-click it.
- Save To File saves the selected accounts page to disk. Once an accounts page has been saved, it can be loaded into a different client using Browse to Format.
- Include in Print, Exclude from Print and Revert to Print Condition are related. Include in Print forces a page to print even if its print condition is not satisfied. Exclude from Print prevents a page from printing. Revert to Print Condition returns the page to being printed if the print condition is satisfied.
- Revert and Make Local are related. Make Local makes a page local, i.e. the page is copied to the current client where it can be edited. Revert replaces the local page with the master copy. The local page is not actually deleted and the user is given the option to reuse it if Make Local is selected again.
- Export format data to Excel exports an accounts page to Excel. It has a minor limitation that it does not show the page headers in the correct font.
- Show Field Chooser allows the user to select which columns are displayed.
To open a page, double click the page. Once open, it can be edited after switching on Draft mode on the Ribbon.
To change the order of the pages, click Change Sequence in the Ribbon, to enable moving pages, and then drag the pages to the required position.
Officers Screen
The Officers screen appears as follows:
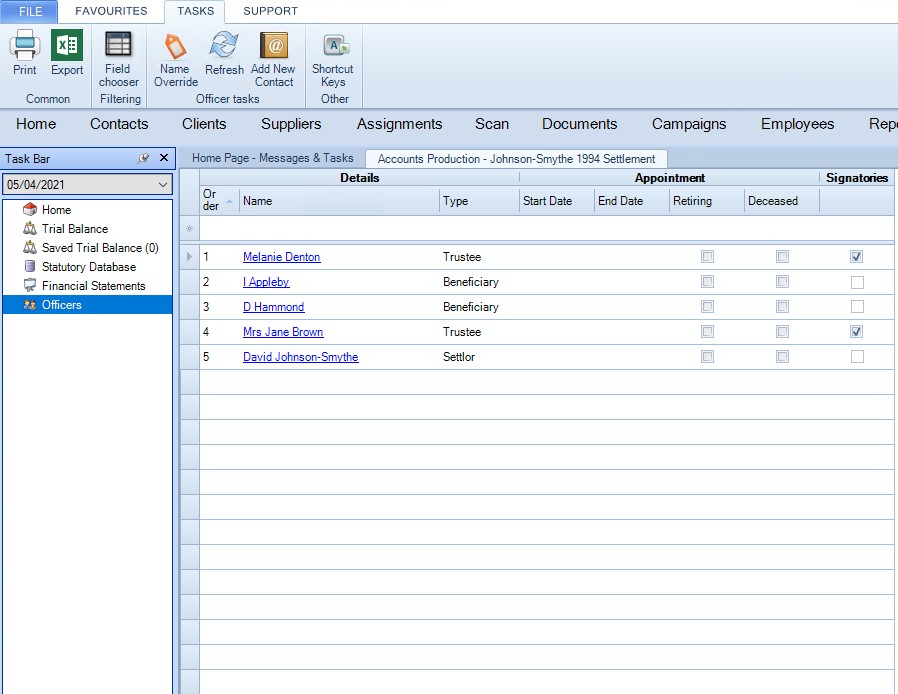
The Officers screen is used to specify the trust’s beneficiaries, settlors and trustees. The columns are as follows:
- Order determines the order in which beneficiaries, settlors or trustees are listed. To change the order, click the column and overwrite the Order value. This may involve renumbering other officers first as no two officers can have the same value for Order.
- Name is a contact. To create a new officer, select the contact in the Name column in the first row of the table.
- Type can be Beneficiary, Settlor or Trustee. If one officer acts in more than one role then one line is needed for each role, as in the example of Lord Trenchmore above.
- Override. This column may not be visible. To add it, either right-click the table and use the Field Chooser, or click Name Override on the Actions menu.
- Start Date, End Date. The period for which the officer acted. Either can be left blank.
- Retiring, Deceased. The reason an officer has ceased acting. One or other of these is usually ticked if an End Date has been entered.
- Signatories. This is only available for trustees. Tick the trustees who should sign the accounts. The trustees ticked are shown in the accounts using the #bsig command (see below).
The options on the Actions menu are:
- Print prints the list of officers.
- Export to Excel exports the officers data to Excel.
- Show Field Chooser allows columns to be added or removed from the table of officers.
- Show shortcut keys. Most of them are obvious or not applicable, but it’s worth knowing that if a new officer is being entered on the top line of the table, the user can press Control-Enter to complete the line without going through all fields. The user can also click on a lower line of the table to complete the entry.
- Add new contact. Opens the usual screen to add a new contact.
- Name override. A shortcut for adding or removing the Name Override column to the table. It’s quicker to use this than Show Field Chooser.
- Refresh. Refreshes the list if a change has been made on the Associations screen or by another user.
Notes:
- Although beneficiaries, settlors and trustees are set up on the Officers screen, other officers need to be set up on the Associated tab.
- To delete an Officer, click a field on its row. The field is ready to be edited. Press Esc. The field is no longer selected and the whole row is selected. Now press the Delete key.
- The formulae for showing officers are discussed under the DirRange command.